Welcome to the seventh lesson of the Computer Essentials module. Up to this point, we have explored hardware architecture, the operating system, and the user interface. Today, we move into the practical realm, tackling two of the most frequent and fundamental activities in computing: producing text documents and transforming them into physical format (printing).
Many users mistakenly believe that writing on a computer requires purchasing expensive office suites. In reality, Microsoft Windows offers powerful and versatile native tools that cover most basic needs. In this lesson, we will analyze the differences between Notepad and WordPad, learn to manage the document lifecycle (creation, editing, saving), and become expert administrators of our printing peripherals.
1. Native Text Labs: Notepad vs. WordPad
Windows makes a sharp distinction between two types of text processing: Plain Text and Rich Text. To manage these two modes, it offers two distinct accessories, accessible via Start > Windows Accessories.
1.1 Notepad: The Essence of Text
Notepad is the simplest and lightest text editor.
- Characteristics: It works exclusively with Plain Text. It does not support bolding, colors, images, or complex alignment.
- Professional Use: It might seem limited, but it is an indispensable tool for programmers and system administrators. Being free of hidden formatting code, it is ideal for writing code, scripts, or “cleaning” text copied from a website before pasting it elsewhere.
- File Format: It saves natively in .txt, a universal format readable by any computer or operating system (Mac, Linux, Android) in existence since the 1970s.
1.2 WordPad: The Evolved Word Processor
WordPad sits halfway between Notepad and complex software like Microsoft Word. It is a full-fledged Word Processor.
Usage: Perfect for writing letters, short reports, simple resumes, or documents requiring basic visual layout.) simile a quella di Office, rendendo l’esperienza utente familiare e intuitiva.
Characteristics: It supports Rich Text. It allows you to format text (font, size, color, bold, italic), manage paragraphs (alignment, indentation, bullet points), and set tab stops.
Interface: It uses the “Ribbon Interface” similar to Microsoft Office, making the user experience familiar and intuitive.


2. Editing Techniques: The Workflow
Regardless of the program used, the mechanics of inserting and manipulating text follow universal standards that every user must master to be productive.
Insertion and Navigation
To insert text, simply click in the workspace (the white sheet) and type. A fundamental concept often ignored by beginners is the use of the Enter key:
- In a word processor, text wraps automatically to the next line when it reaches the right margin.
- The Enter key serves only to close a paragraph and start a new one. Pressing it at the end of every line is a conceptual error that compromises the document’s future formatting.
The Triad: Cut, Copy, and Paste
These operations manage the transfer of data through the Clipboard, a temporary memory area in the RAM.
- Copy (Ctrl + C): Duplicates the selected text and parks it in the clipboard, leaving the original intact.
- Cut (Ctrl + X): Removes the selected text from its original position and moves it to the clipboard. It is the digital equivalent of “moving” an object.
- Paste (Ctrl + V): Takes the content from the clipboard and inserts it at the current cursor position.
Technical Note: You can copy text from Notepad and paste it into WordPad (and vice versa). However, when pasting from WordPad to Notepad, all formatting (colors, bolding) will be stripped away, preserving only the characters.utte le formattazioni (colori, grassetti) verranno perse, mantenendo solo i caratteri.


3. Data Persistence: Saving and Formats
Writing is useless if the work is not preserved. The concept of “Saving” implies transferring data from volatile memory (RAM) to mass storage (Hard Disk/SSD).
Save vs. Save As
- Save (Ctrl + S): Updates the existing file, overwriting the last version.
- Save As: Creates a new file, allowing you to specify three vital parameters: the Name, the Path (location), and the Format.
WordPad Formats
WordPad offers superior versatility in saving, which is essential for interoperability (the ability to exchange files with other users):
- RTF (Rich Text Format): The native format. It retains formatting and is readable by almost all word processors.
- DOCX (Office Open XML): The standard format of Microsoft Word. WordPad can read and write it, ensuring compatibility with Office users.
- ODT (OpenDocument Text): Crucial for compatibility with the Open Source world (such as LibreOffice or OpenOffice). Choosing this format demonstrates high digital awareness and respect for open standards.


4. From Screen to Paper: Printing
Printing is the process of translating bits into ink. Windows manages this process through a centralized system.
The Print Interface
Access to printing varies slightly based on the application type:
- Classic Desktop Apps (e.g., WordPad, Notepad): Accessed via File > Print.
- Modern Windows Apps (UWP): Often accessed via the “Hamburger Menu” or the “Share” icon.
Before launching the final print, it is best practice to analyze the Print Preview (WYSIWYG – What You See Is What You Get). This function shows exactly how the sheet will look on screen, allowing you to correct bad margins or cut-off text, saving paper and ink. In the print settings, we can define:
- Number of copies.
- Orientation (Portrait vs. Landscape).
- Page range (All, Current Page, or Specific Pages).


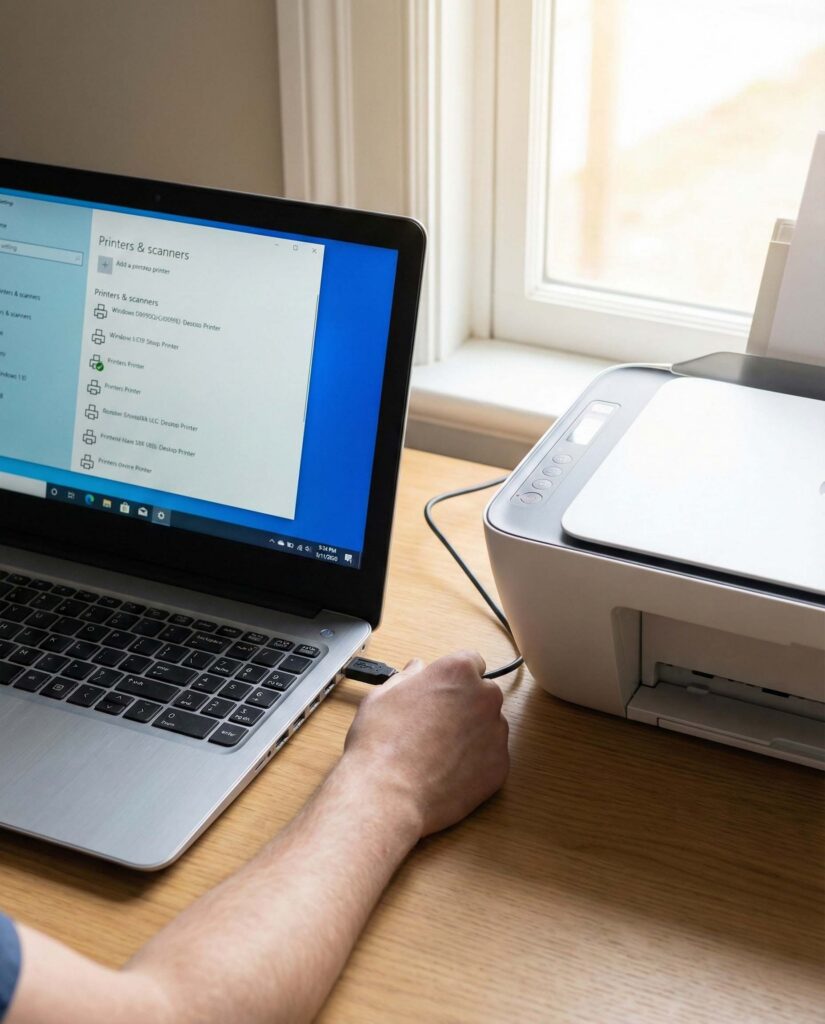
5. Hardware Management: Devices and Printers
To print, software must communicate with hardware. This communication is mediated by Drivers and managed by the Control Panel.
The Control Center
The list of installed printers is visible in two areas:
- Classic Control Panel: Start > Windows System > Control Panel > Hardware and Sound > Devices and Printers (Offers a more technical view).
- Modern Settings: Start > Settings > Devices > Printers & scanners.
Every printer is represented by an icon. A green checkmark indicates the Default Printer, which programs will automatically select unless the user chooses another.
Smart Feature: Windows 10 and 11 offer the option “Let Windows manage my default printer.” If active, the system sets the last used printer at your current location as default (useful if you use a laptop between home and office). For manual control, this option must be disabled.
Installation and Uninstallation
Removal: To uninstall a printer (perhaps broken or sold), simply right-click its icon in “Devices and Printers” and choose “Remove device.” This clears the system connections, though it doesn’t always remove the full driver package.casa e ufficio). Per avere il controllo manuale, questa opzione va disattivata.
Plug & Play: Most modern printers (USB) install automatically upon connection. Windows recognizes the device, downloads the driver, and configures it.
Manual Installation: If the printer is not detected (often happens with older network or Wi-Fi printers), use the “Add a printer” button, which starts a Wizard to search for drivers.

6. Troubleshooting: Print Queue and Test Page
Even in the best systems, printing can get stuck. Understanding how to diagnose and resolve issues is a key skill.
The Test Page
If the printer seems connected but won’t print our files, the issue could be in the program (e.g., WordPad) or the printer itself. To isolate the problem, we use the Test Page.
- Path: Right-click Printer Icon > Printer Properties > General Tab > Print Test Page. If this page prints correctly, the hardware and drivers are working; the problem lies within the document you are trying to print.
The Print Queue (Spooler)
When we click “Print,” the document does not go directly to the printer (which has limited memory) but is sent to a holding area on the hard drive called the Spooler or Print Queue. The printer icon appears in the notification area (bottom right) during this process. Clicking it opens the Queue window. Here we see the list of pending documents. It is a powerful management tool:
- Pause: Pauses printing (useful if you run out of paper and want to refill without losing the job).
- Cancel: Deletes the document from memory. Essential if you accidentally sent a 100-page file and want to stop the printer before it wastes ink.


Conclusion
In this lesson, we have transformed the simple act of “writing and printing” into a conscious process. We learned to choose the right tool (Notepad for cleanliness, WordPad for form), ensure file longevity by choosing open formats like ODT, and manage print peripherals not as passive users, but as system administrators.
These skills are the foundation of office and home operations. In the next lesson, we will complete the operating system overview by discussing advanced file and folder management.
Lesson Glossary
- ASCII/Unicode: Character encoding standards used in Notepad.
- Driver: Software that teaches the operating system how to communicate with specific hardware (e.g., the printer).
- Spooler: System service that manages the timed sending of documents to the printer.
- WYSIWYG: Acronym for What You See Is What You Get, referring to the correspondence between the screen display and the printed output.
Practical Exercise
- Open Notepad, write a grocery list, and save it to the Desktop.
- Open that file with WordPad, apply colors and bolding, and save it as an .RTF file.
- Try copying text from a web page and pasting it first into Notepad (to see how it strips formatting) and then into WordPad.
- Access the “Devices and Printers” panel and print a Test Page on your default printer.
Congratulations on completing lesson seven! Are you ready to move on to the next module?
INFOGRAPHIC:
